2a. Installer
[FIXED 2022-11-13] Linux Users: Windowed Mode causes Game/Desktop Crash with GNOME/MATE
NOTE 2022-11-13: We have added a workaround in our mod to fix this issue. Let us know if you still have this problem on the latest version of the mod.
Triggering the bug
This bug is triggered when:
- you transition from fullscreen to windowed mode
- the game launches in windowed mode
- you drag the window around
If the game is always in fullscreen mode, the bug will never be triggered.
The bug only seems to affect chapters 3-6, although theoretically it could trigger on chapters 1 and 2. It occurs even on the unmodded game.
The bug does not affect all desktop environments, however GNOME desktop is known to be affected.
Symptoms of the bug
When the bug is triggered, the game window will become extremely large or small, and the screen will be colored a black or blue color.
After this happens, the game may freeze, crash, or sometimes your whole desktop environment will crash.
Cause of the bug
This bug is due to Unity versions ≤ 5.5.3p3 having a broken window resize function that sends uninitialized stack data to XSetWMNormalHints.
See the following links for more details:
Be careful with old save files!
Save files from older versions of the patch or the vanilla game are not expected to work properly with our patch. They might look fine sometimes, but you will hit a roadblock eventually. We recommend to start fresh from the beginning or use the "Chapter Select" function to start at the current chapter you were playing before. You can also hold ctrl to skip the game in high speed mode.
Multiplatform Installer Instructions
Please select your operating system from the tabs below
Starting the installer
- Download
07th-Mod.Installer.Windows.exeto your computer from the Download Page to your Downloads folder.- If possible, do not run the installer from a temporary folder.
- To do this, ensure you download the installer to your Downloads folder.
- DO NOT move the installer
.exeto a special or cloud storage folder- We recommend running the installer from your Downloads folder to avoid issues with permissions or cloud storage
- DO NOT move the installer to the game folder. Although some other game patchers work like this, the 07th-mod installer may fail if run from the game folder.
- DO NOT run the installer from a cloud storage folder like
Desktop,Documentsetc.- Windows enables cloud storage for
DesktoporDocumentsby default - so you may unknowingly have it enabled.
- Windows enables cloud storage for
- If a "Windows SmartScreen" warning appears, click "More info", then choose "Run anyway".
- If possible, do not run the installer from a temporary folder.
- Run the installer from your Downloads folder - the installer launcher will appear and extract to
07th-mod_installer.- Do not close this window until you are finished using the installer.
- When extraction is finished, click "Run Installer".
- The installer will open as a web page in your browser. This is the installer's interface.
- Please note: if a page takes too long to load, try refreshing the page
- If you still cannot get the web page to load, restart the installer launcher, and enable the
Run in Safe-Modecheckbox to run the text-based installer.
Using the installer
- On the web page that was just launched, click on the mod you want to install.
- Fill in your game path, and mod options as applicable, then start the installation.
- If you wish to stop an install that is in progress, you MUST either click the Quit Installer button, or close the launcher. If you just close the webpage, the install will still run in the background!
- When the install finishes, "The install was successful!" will be displayed. Please carefully read the information that is displayed, which may contain gotchas/extra tasks you may need to do.
MacOS 12 (Monterey) and Higher - Installing Python 3
You only need to perform these steps on MacOS Monterey and higher, which do not come with Python:
- Go to https://www.python.org/downloads/
- Download Python 3 using the yellow download button near the top of the page
- Run the Python 3 installer, and follow the prompts to complete the install
Starting the mod installer
- Download the Mod Installer for Mac
-
Double-click on the zip file to extract it (your browser might automatically do this after downloading)
- Warning: Do not move the
install.commandfile out of the extracted folder.
Click here if you want to move the install.command file for some reason
The zip contains two hidden files that are required by the installer. If you try to move the
install.commandfile out of the folder, it won't be able to find them.If you really want to move the
install.commandfile out of the folder, press ⇧⌘. (Shift-Command-Period) to temporarily enable showing of hidden files and copy the.7zaand.aria2cfiles to the same folder. - Warning: Do not move the
-
In the extracted files, look for a file called
install.command(might also be calledinstall). - Right click on this file and choose
Open- If you get a "Operation not permitted" error, try following these steps to give Terminal the correct permissions.
- If prompted with a security prompt, choose
Open - If you cannot get the web page to load, run the
install_safe_mode.command(might be calledinstall_safe_mode) file instead to use the text-based installer - If the window immediately disappears / does nothing and you are on MacOS 12 (Monterey) or higher, check you have installed Python 3 as per above instructions
- Opening the installer will launch a page in your browser. This is the installer's interface.
- If the browser is launched, but the page does not load, try refreshing the page
- Do not close the page until the install finishes
Using the installer
- On the web page that was just launched, click on the mod you want to install.
- Fill in your game path, and mod options as applicable, then start the installation.
- If you wish to stop an install that is in progress, you MUST either click the Quit Installer button, or close the terminal. If you just close the webpage, the install will still run in the background!
- When the install finishes, "The install was successful!" will be displayed. Please carefully read the information that is displayed, which may contain gotchas/extra tasks you may need to do.
If path auto-detection fails - Finding Game Path Manually
If game path auto-detection fails, you can follow these instructions to find the game path:
- Click the big green "Select Application (.app file) Manually (Open File Dialog)" button, just below the path entry textbox.
- A Finder window entitled "Please choose a game to install to" will open. We will leave it for now, but need it later so don't close it
- Open Steam, and navigate to your game list
- Right-click on the game you want to mod in the game list, and select "Properties"
- Navigate to the "LOCAL FILES" tab of the window that popped up
- Click "Browse Local Files". Another finder window will pop up, showing the game files.
- Locate the "Umineko1to4"/"HigurashiEp0X" file, which should visually have a proper game icon. Ignore the other files without a proper icon. These files have the ".app" extension, but the extension may be hidden.
- Drag and drop the file onto the previously opened "Please choose a game to install to" Finder Window
- Click the "Choose" button
For reference, the default steam folder is ~/Library/Application Support/Steam/steamapps/common/, but yours may be different.
If you're using a Steam Deck, please click the 'Steam Deck' tab above!
Important Pre-installation steps (Wine/Proton Setup)
Native vs Wine/Proton Background Information
There are two methods of running the game on Linux:
- Running the Native Linux version of the game
- Running the Windows version of the game on Linux using Proton (Steam/MangaGamer/GOG) or Wine (MangaGamer/GOG)
As some users have issues with the Native Linux version of the game, we recommend the following:
Higurashi Mods
-
If you bought from Steam, it is suggested you enable Proton before installing the mod to avoid the above problems. See the instructions below.
-
If you bought from GOG/MangaGamer:
- We suggest trying the Native Linux version of the game first
- If you have problems with the native version, you can try Wine (plain Wine, using Lutris, or using Minigalaxy (GOG only)). However you will need to research how to do this yourself. (If anyone wants to provide a tutorial for this, please let us know.)
- You might only encounter issues with the Native version when reaching Chapter 5 onwards
Umineko Mods
-
One user reported that the Steam Deck + GOG version of the game had no sound, even on the unmodded game. This was fixed by going into the "lib64" folder and deleting every file except for "libsteam_api.so".
-
We haven't done much testing of using Wine/Proton for Umineko. Try the native version (or on Steam, whatever Steam recommends), then if you have problems, you can try the Wine/Proton version.
If you're not sure if you installed Native Linux or Wine/Proton, the installer will tell you after you've selected the game to be modded.
[Wine Higurashi Users Only] No Text On Startup Problem - Missing corefonts
Some Wine users have reported an issue on Higurashi where there is no text when they first boot the game - see below screenshot:
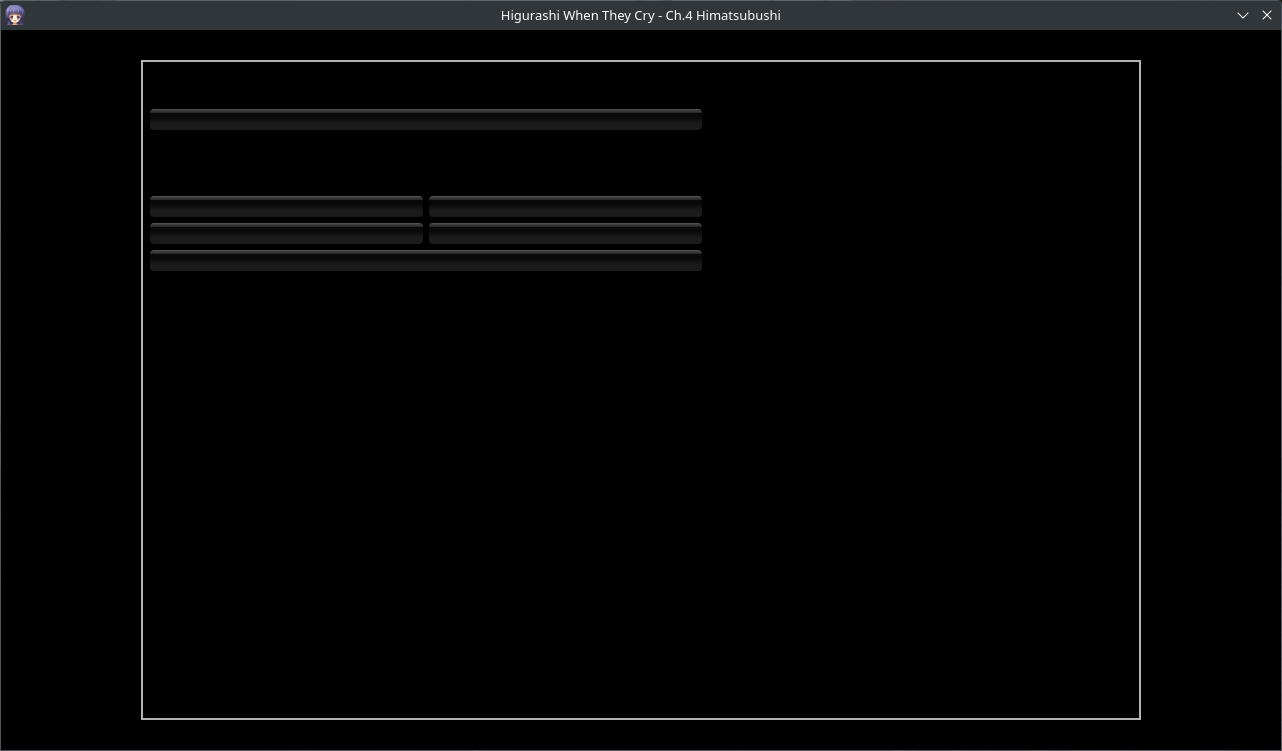
If you have this issue, you will need to install corefonts. Installing corefonts can differ on each system, but some instructions are provided at this FAQ "No Text On Startup - Missing corefonts"
Steam Instructions for enabling/disabling Proton
NOTE: Saves might not be compatible between Native and Proton! Changing this setting may lose your save files!
- Make sure the game is installed. Take note of whether the game is already modded.
- Right click the game you want to modify in your Steam Library
- Click Properties..
- On the left hand panel, click Compatability
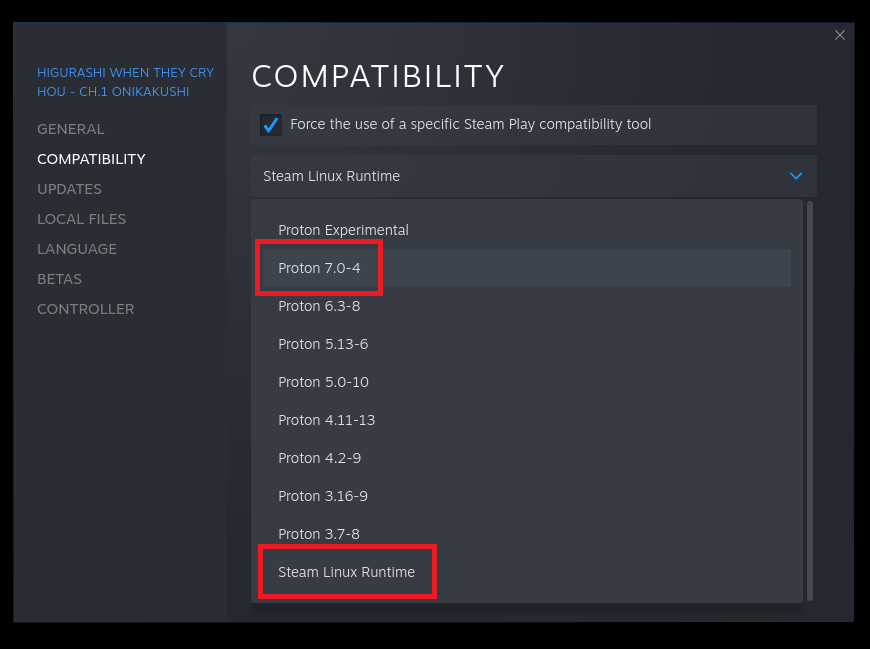
- Tick the checkbox "Force the use of a specific Steam Play compatibility tool"
- Choose the version you want to use from the dropdown box:
- If you want to use Native Linux version, choose 'Steam Linux Runtime'
- If you want to use Proton, choose the latest stable Proton version (you can try 'Proton Experimental' if you have problems with the stable versions)
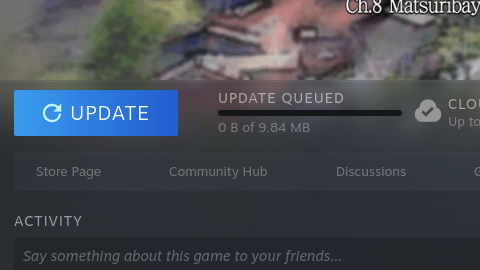
- Click "Update" apply the changes, and wait the update to finish (make sure the game is closed).
- If you haven't installed the mod on this game before, proceed to "Starting the Installer"
- If you've already installed the mod on this game before:
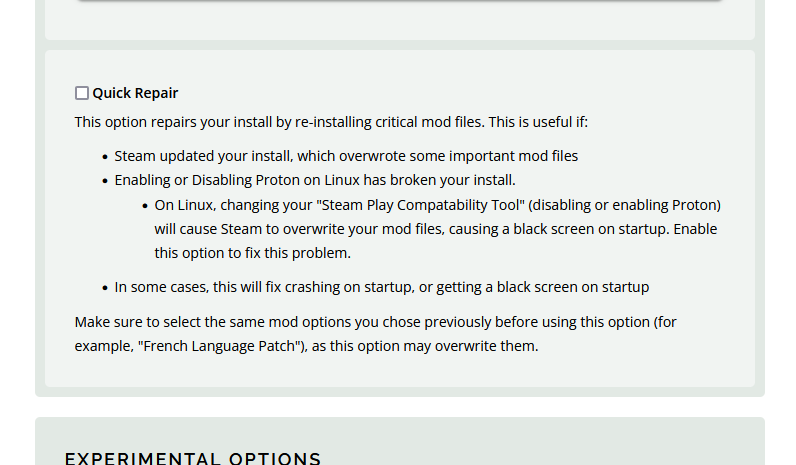
- If the mod is already installed, switching between Native and Proton with Steam will overwrite important mod files. This usually causes a crash or black screen on startup
- To fix this, you need to re-run the installer, and 'update' the mod, making sure to select the 'Quick Repair' option.
Downloading and Starting the installer
- Install the following using your distribution's package manager:
- Python 3.7 and above
- You can use Python 2, but some browsers will require you manually refresh the page for the installer to load.
- Optional: Python Tkinter (This is required to use the file-picker in the installer. Just use autodetection/paste in the game path if you can't install this.)
- Ubuntu:
sudo apt-get install python-tk - Arch Linux:
sudo pacman -S tk - Fedora:
sudo dnf install python2-tkinteror
sudo dnf install python3-tkinter - If your distribution is not listed, you may need to lookup how to install tkinter on your particular distribution
- Ubuntu:
- openSUSE users will need to install the package
python-xmlor the installer will fail withNo module named xml.etree.ElementTree - 32-bit linux users will need the following
- p7zip (get the 'full' version)
sudo apt install p7zip-full - aria2
sudo apt install aria2
- p7zip (get the 'full' version)
- Python 3.7 and above
- Download
07th-Mod.Installer.linux.tar.gzto your computer from the our Github Releases page - Run the shell script called
setup. The installer will open as a web page in your browser.- You will most likely need to open a terminal and run it from there, unless your file browser supports running the script directly.
- If you still cannot get the web page to load, run
setup_safe_modeto use the text-based installer.
- Opening the installer will launch a page in your browser. This is the installer's interface.
- If the browser window doesn't appear, you can manually copy or type the link into your browser. Usually the address will be
http:127.0.0.1:8000/loading_screen.html, but the8000number may be different so be careful. - If the browser is launched, but the page does not load, try refreshing the page
- Do not close the page until the install finishes
- If the browser window doesn't appear, you can manually copy or type the link into your browser. Usually the address will be
Using the installer
- On the web page that was just launched, click on the mod you want to install.
- Fill in your game path, and mod options as applicable, then start the installation.
- If you wish to stop an install that is in progress, you MUST either click the Quit Installer button, or close the terminal. If you just close the webpage, the install will still run in the background!
- When the install finishes, "The install was successful!" will be displayed. Please carefully read the information that is displayed, which may contain gotchas/extra tasks you may need to do.
The Steam Deck is new, so these instructions may become out of date quickly. Please let us know if these instructions don't work or need updating
Higurashi Save Problems on Ch.6 and above
It was reported on Steam Forums on the vanilla game that you couldn't save on Ch.6 (and possibly later chapters), even though Ch.1-5 work fine on the Steam Deck.
The solution was to:
- If using Proton, force Proton 7 under Compatability options (see below section)
- Also, using Native ("Steam Linux Runtime") might work too.
Steam Deck REQUIRED Initial Setup
- You MUST enable Desktop Mode from the STEAM menu, by selecting "Power", then "Switch to Desktop".
- You MUST install Firefox via Discover for the installer to open automatically in your browser
- If you're not sure, just install Firefox to make things easy.
- If you want to use another browser, you will need to manually copy the installer URL that is printed in the Konsole terminal. Instructions to do this are listed in "Downloading and Starting the installer" below.
- We highly recommend plugging in a mouse and keyboard into the Steam Deck to make using the installer easier.
Important Pre-installation steps (Wine/Proton Setup)
Native vs Wine/Proton Background Information
There are two methods of running the game on Linux:
- Running the Native Linux version of the game
- Running the Windows version of the game on Linux using Proton (Steam/MangaGamer/GOG) or Wine (MangaGamer/GOG)
As some users have issues with the Native Linux version of the game, we recommend the following:
Higurashi Mods
-
If you bought from Steam, it is suggested you enable Proton before installing the mod to avoid the above problems. See the instructions below.
-
If you bought from GOG/MangaGamer:
- We suggest trying the Native Linux version of the game first
- If you have problems with the native version, you can try Wine (plain Wine, using Lutris, or using Minigalaxy (GOG only)). However you will need to research how to do this yourself. (If anyone wants to provide a tutorial for this, please let us know.)
- You might only encounter issues with the Native version when reaching Chapter 5 onwards
Umineko Mods
-
One user reported that the Steam Deck + GOG version of the game had no sound, even on the unmodded game. This was fixed by going into the "lib64" folder and deleting every file except for "libsteam_api.so".
-
We haven't done much testing of using Wine/Proton for Umineko. Try the native version (or on Steam, whatever Steam recommends), then if you have problems, you can try the Wine/Proton version.
If you're not sure if you installed Native Linux or Wine/Proton, the installer will tell you after you've selected the game to be modded.
Steam Instructions for enabling/disabling Proton
NOTE: Saves might not be compatible between Native and Proton! Changing this setting may lose your save files!
- Make sure the game is installed. Take note of whether the game is already modded.
- Right click the game you want to modify in your Steam Library
- Click Properties..
- On the left hand panel, click Compatability
- Tick the checkbox "Force the use of a specific Steam Play compatibility tool"
- Choose the version you want to use from the dropdown box:
- If you want to use Native Linux version, choose 'Steam Linux Runtime'
- If you want to use Proton, choose the latest stable Proton version (you can try 'Proton Experimental' if you have problems with the stable versions)

- Click "Update" apply the changes, and wait the update to finish (make sure the game is closed).
- If you haven't installed the mod on this game before, proceed to "Starting the Installer"
- If you've already installed the mod on this game before:
- If the mod is already installed, switching between Native and Proton with Steam will overwrite important mod files. This usually causes a crash or black screen on startup
- To fix this, you need to re-run the installer, and 'update' the mod, making sure to select the 'Quick Repair' option.

Downloading and Starting the installer
- Download
07th-Mod.Installer.linux.tar.gzto your computer from the our Github Releases page to yourDownloadsfolder. - Right click the archive, then click "Extract" > "Extract archive here"
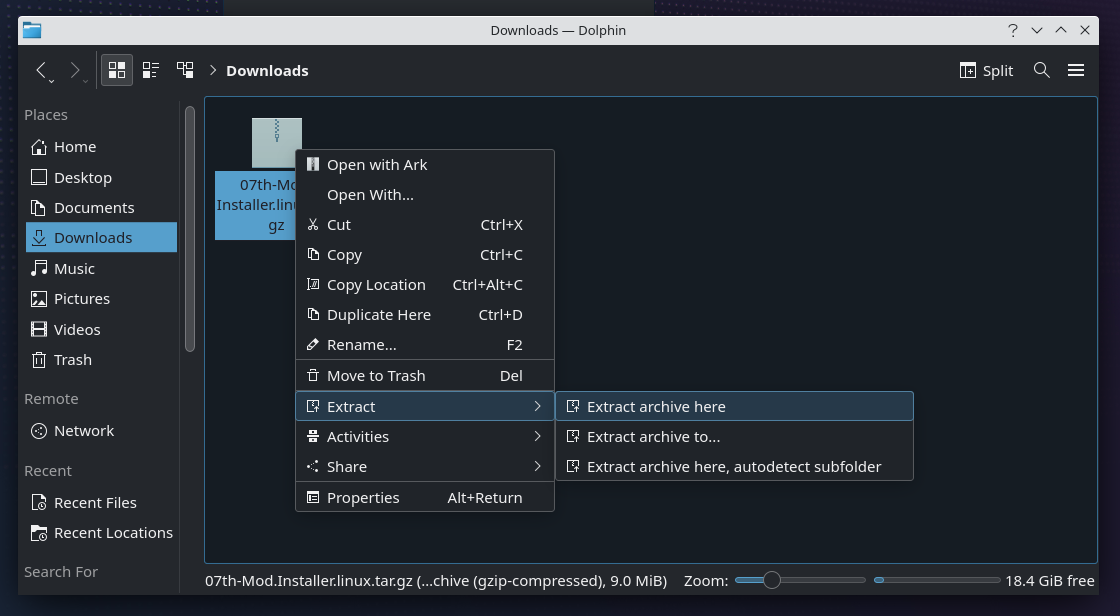
- In some cases, you may see a checkbox called "☑ Preserve paths when extracting". Ensure it is ticked (☑) or the installer will fail with a 404 error on the loading screen.

- After extraction is complete, a folder called "07th-Mod_Installer_Linux64" should be created.
- Right click the
setupfile located in the "07th-Mod_Installer_Linux64" folder, then click "Run In Konsole"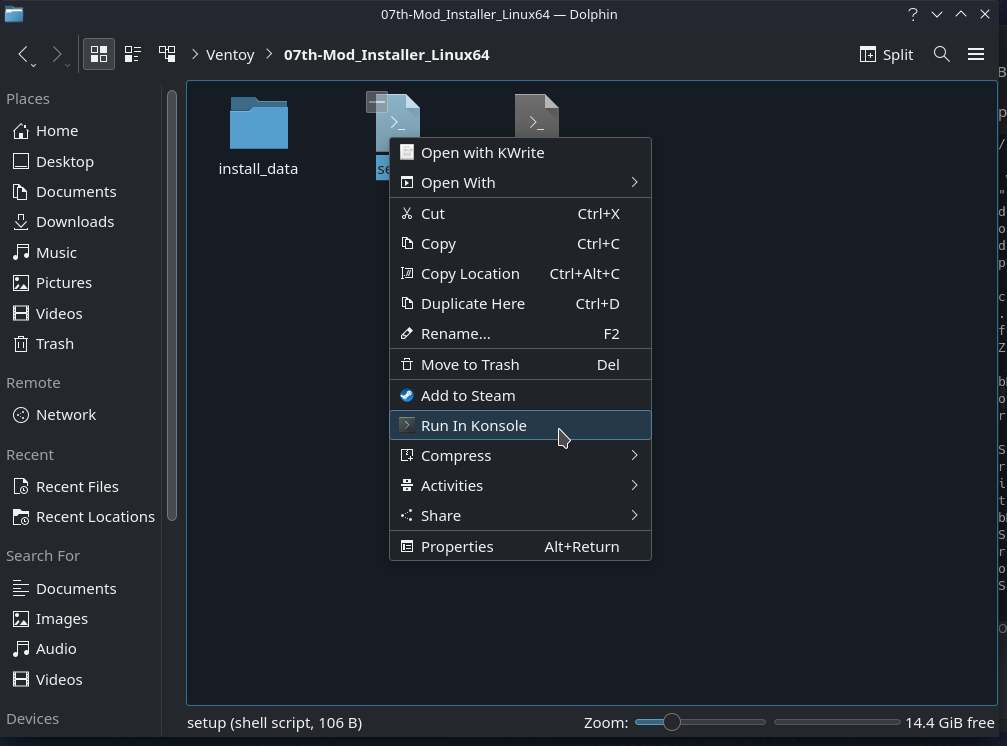
- After some time, hopefully the installer's interface will open as a web page in your browser. If it does not, see instructions below.
- Most likely you did not install Firefox earlier via Discover. Install it now, then restart the installer.
- As an alternative, you can manually right-click and 'Copy Link Address', then paste the link into your browser. Usually the address will be
http:127.0.0.1:8000/loading_screen.html.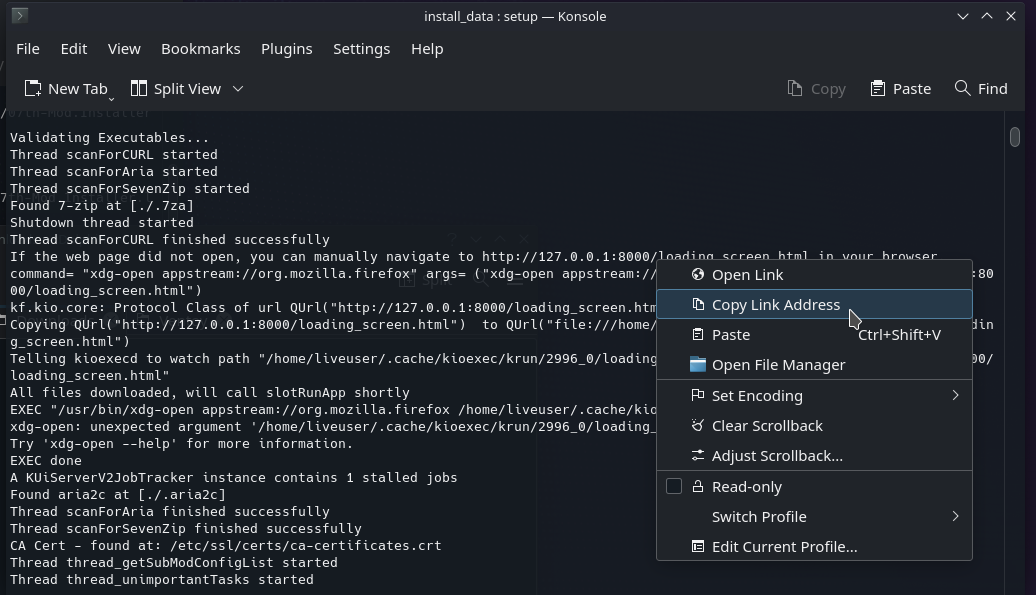
- If the browser is launched, but the page does not load, try refreshing the page
- If you still cannot get the web page to load, run
setup_safe_modeto use the text-based installer. - If you get a 404 error trying to load
loading_screen.htmllikely you did not tick the "☑ Preserve paths when extracting" checkbox when extracting the installer. Try extracting the installer again with this checkbox ticked.
Using the installer
- On the web page that was just launched, click on the mod you want to install.
- Fill in your game path, and mod options as applicable, then start the installation.
- If you wish to stop an install that is in progress, you MUST either click the Quit Installer button, or close the terminal. If you just close the webpage, the install will still run in the background!
- When the install finishes, "The install was successful!" will be displayed. Please carefully read the information that is displayed, which may contain gotchas/extra tasks you may need to do.
Power users can try a few different ways of running the installer on this page
Using the installer
- On the web page that was just launched, click on the mod you want to install.
- Fill in your game path, and mod options as applicable, then start the installation.
- If you wish to stop an install that is in progress, you MUST either click the Quit Installer button, or close the terminal. If you just close the webpage, the install will still run in the background!
- When the install finishes, "The install was successful!" will be displayed. Please carefully read the information that is displayed, which may contain gotchas/extra tasks you may need to do.
Resuming an install / Restarting a failed install
If the install fails:
- Refresh the page
- Double check the options are the same the last attempt (the installer should remember)
- Start the installation
If you quit the installer while it was running:
- Start the installer again
- Select the same options as the last attempt
- Start the installation
In most cases the installer will resume downloads, so you don't need to re-download everything. Please ignore any "checksum failed" warnings if you get them - this is normal.
Updating Games
To update your game, run the installer again for the game you want to update - remember to use the same mod options as before. The installer should install the updated components, and any other dependent components.
[❓] Game and Installer Troubleshooting
- For Install Problems, check the Installer FAQ to see if your problem is already answered.
- For Game Problems, Check the Higurashi FAQ / Umineko FAQ
- If your issue is not resolved, please proceed to the Support Checklist
Uninstalling Games
To fully remove the game and mod files, you must follow the below instructions:
- Navigate to the game folder. In Steam, you can do the following to show the game folder:
- Right click on the game in Steam, then click "Properties"
- Change to the "Local Files" tab
- Click "Browse Local Files..." and the folder should appear
- Remove the game "normally". You can use Windows "Add or Remove Programs", or use the Steam/GOG launcher (if you installed with Steam/GOG).
-
Manually delete the game folder if it's not already deleted!
You MUST do this step to fully remove the mod files! If you do not do this, the installer may not work on future installs, and the mod files will take up space on your computer. Steam is known to keep mod files during uninstall.
Optional: Uninstall Save Files
You may want to remove save files if you're having technical issues and want to start from scratch:
- For Higurashi, save files are kept outside the game directory. See FAQ: "Save File Locations" to find the save files, then delete them.
- For Umineko, usually the save files are kept in the
mysavfolder of the game directory, so they would already be removed. But see FAQ: "My save files have disappeared or changed unexpectedly" for more details.
